Thursday, September 30, 2010

Practice Practice Practice!

Basic camera light meters are good for grabbing memories on the run.  But the more I photograph, the more I realize that they only get the photo I'm looking for about 1/3 of the time!  They average the light in the frame and give you a compromise exposure.  Safe, but not always effective.

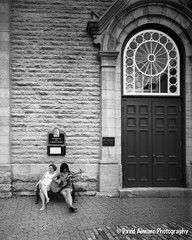
Here's one, for example, where I knew that I wanted the person's skin to be lighter than average, and it's the darkest part of the photo:

With the white background, the meter would have made the skin much darker than normal, but that's not what I was going for (sorry I didn't do a darker one for comparison).

Ansel Adams had an approach that he used mostly with black and white called the zone system.  This is what many people shooting with meter-less cameras, especially large format, use.  A spot meter is used to take readings of very specific, small areas of the composition to be photographed, and those readings are placed on a sliding scale from dark to light (oversimplifying to say 0-10 from dark to light, but we'll use that).  A typical wide area light meter determines an average for the equivalent of 5 (in the middle).  In the photo above, her skin would have come out to about 3 or 4 because the background would have been about 6 or 7, and the two would have been averaged.  In the actual photo above, the skin is about zone 5-7 or so, and the background about zone 9.

Below are four photos of the same subject with different exposures from average to darker, each separated by the equivalent of one full f-stop on the camera (which is roughly equivalent to one step on our 0-10 scale).

1/30 sec @ f/2.8
1/60 sec @f/2.8
1/120 sec @f/2.8
1/250 sec @f/2.8

The first photo was the camera meter's average.  Great for a snapshot.  But what if you wanted the grass and the white box exposed better?  Halving the exposure is a step in the right direction, and the grass is more naturally green.  The third and fourth photos put the box in about zone 4-6, at the expense of the darker background.

OF COURSE THERE IS NO OBJECTIVE CORRECT EXPOSURE, just decisions on what the photographer and viewer may be looking for.

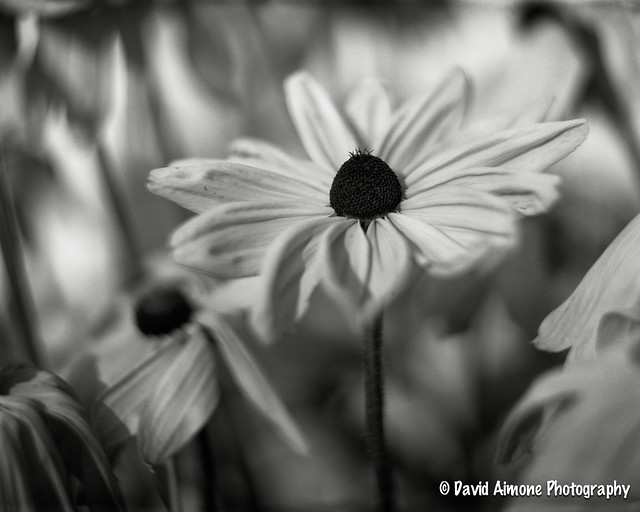
So, these are not great artistic examples, but good enough to explain the basics.  Why am I concerned with this?

My large format camera has NO meter in it.  I use a spot meter to meter the grass, tree trunks, background foliage and the box separately and then decide where to lay them out along the zone system scale of 0-10.

However, I'm not that experienced at doing this and judging where on that scale each item should be located.

So, I've pledged to spend some time PRACTICING!  What I am doing is taking my spot meter out and making educated guestimates where parts of a scene go when visualizing.  Instead of wasting lots of film in practicing, I am using my digital camera in MANUAL mode, and testing out these guestimates to experience what the results actually are.

This is harder than it might sound.  Eventually, however, it will help me to be more confident when spot metering with the film camera, and more adventurous with the digital camera.

Just like I pretty much don't use the automatic focus on my digital camera anymore unless it's a fleeting moment.  I can focus better and quicker doing it myself!

Saturday, August 14, 2010

Slowing Down


One of the attractive things to me about using a large format view camera is that you have to slowwwwww dowwwwwwnnnnnnn....

It's probably one of the things that keeps so many people away from large format film.  A photograph is an event—to plan, to prepare for, to execute, to document, to review and to revisit.  You inherently miss a lot of other shots.  That's what my digital camera is for.

Not that I just shoot willy-nilly with the digital, but when I do use the camera I can easily grab a new view here and there, and often take dozens of photos in the time it would take me to do one large format photo.  Both have their place.  Besides getting a lot of nice photos, digital is a lab, a sketch, a draft which can be refined, discarded, used or thrown away.  No big deal—(no) film is cheap!

With the large format camera, however, you have to almost meditate on the shot, from the first notice of a visual opportunity, to composition, angles, perspectives, light characteristics, setup logistics and much more.  You better have a decent idea of what you're going to do before you do it.  No point and shoot here.  Besides the planning and conceptualization, there is the mechanical process of taking a photo.  To borrow from another photographer, Bruce Barlow, there are both process/technical and artistic/conceptual sides to large format photography.  Both are very important.  But, the best happens when you do one while the other is on auto-pilot because you've had experience.

I'm still getting there.  I've ruined a photograph because I've concentrated so much on technical aspects, worrying about focus, not exposing the film prematurely and so on to the point of clicking the shutter without due consideration to the photo itself.

I have also taken what I assume were wonderful photos, only to have them ruined by making a significant technical error....like exposing the wrong side of a sheet of film!

That's the learning process.  But now, it is getting more meditative as the technical becomes more second nature.

Monday, August 9, 2010

Large Format Film So Far...

Outside Chapelle Des Ursulines


Always more to learn, though. Putting a basic darkroom in my basement!!! Realized that large format film and darkroom are like horse and carriage...

In this photo, simple things like the fact that I'm near ground level, but I'm using a wide angle lens to capture a good deal above, yet the perspective is not skewed because I'm not pointing the camera up (I could if I wanted to, even exaggerate it), instead, I'm shifting the front of the camera up in parallel to the back!

Tuesday, August 3, 2010

An interesting antique...

I picked up this very old lens for a song.  It's in beautiful shape, and considered to be an excellent lens still today.  It will be extremely sharp, but will impart a slightly ethereal feel to the photo being taken.  It has no shutter, and four aperture settings by a combination of levers.

Once I get it fitted to a lens board for my view camera, I'll be able to use a relatively slow film and cover the lens with something like a hat to use as a shutter; or I have a mechanical Packard shutter I can hang on the front and shoot roughly between 1/25th of a second and forever...

Always another challenge down the road!

http://www.davidaimone.com/p68515664
Darlot Hemispherical Rectilinear Lens circa 1869
Paris, France

Friday, July 9, 2010

More 4x5 Film

Talcott Falls Monochrome

I've been shooting some 4x5 film with a view camera, and slowly getting tuned to the process. This one I developed myself and then scanned the negative into photoshop. This was a black and white negative, and just toned it a bit on the computer.

Here are some more large format film shots.

Wednesday, June 30, 2010

Monhegan Part 2

I've been back for a while and have processed quite a few digital and will also have additional film shots soon.  Here's one on film from Monhegan:


Soon it will be time for Quebec City!